
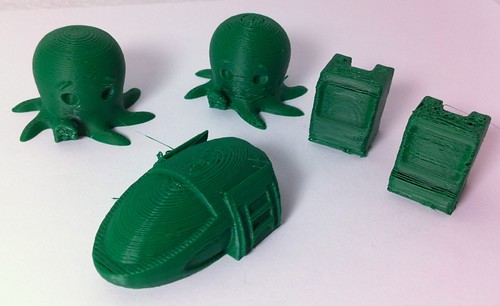
Since I recently got accelerated printing working using Jetty’s firmware, I thought I would try to see what kind of quality difference I would get. The cute little octopus was designed by Makerbot, and I knew I had to print him. The copy on the left was printed without acceleration, using the standard 30 mm/s feedrate. He took about 45 minutes to print (he’s about 1.5″ tall).
The octopus on the right was printed accelerated at 75 mm/s, and took about 20 minutes. He actually came out pretty well. Some of the layers are slightly misaligned, but I know that my settings need more tweaking. The hovercar in front was actually my first really successful accelerated print. He was printed a few weeks ago, also at 75 mm/s.
The two Mac Plus models are a different story. They were the first objects I tried to at high speed after getting the calibration cubes to work well. I believe the one on the right was printed first, but it was printed at 100 mm/s. The one of the left was printed at 75 mm/s and did better, but I think the model was just too small to be printed at such high speed. Since I was only using 15% infill, the layers took so little time I don’t think they were cooling enough before the next layer started, causing the poor finish.
I’ve been playing with accelerated printing on and off, I still need to do some tweaking. Stuff I want to come out well (such as my Raspberry Pi case, and a case I’m printing for my Polargraph SD) I still print unaccelerated.